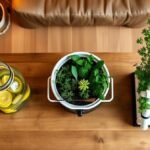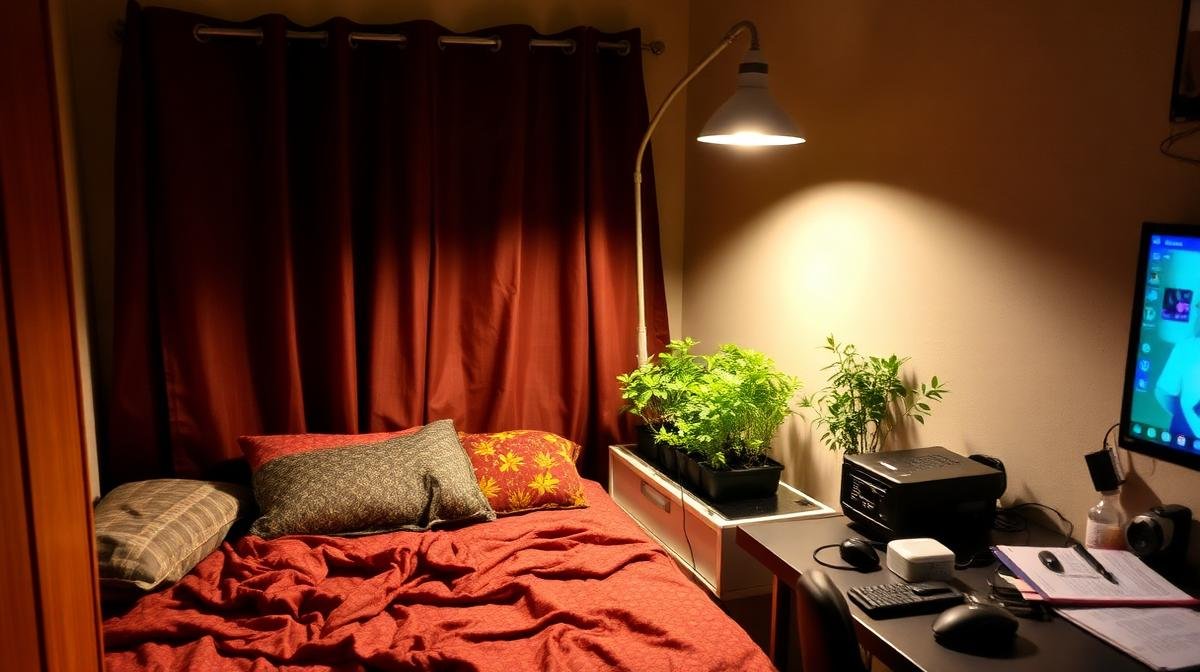
Okay so here’s the thing — I never planned to grow anything in my bedroom. Like, the idea of having dirt and water next to my bed? Nah. Hard pass. But then I wrote that blog about building a hydroponic setup in a 2×2 ft space, and something weird happened.
People kept DMing me asking “bhai, what if I don’t even have a balcony?” And honestly? That hit home. Because before I moved to my current place, I had a room. Just a room. No balcony, no terrace, nothing. A window that barely opened and a corner where I used to dump clothes I was “going to fold later.”
So I thought — let me actually try this. Let me take that useless corner and turn it into something alive. Literally.
The Short Answer (Because I Know You’re Scrolling Fast)
Yes, you can absolutely grow herbs and leafy greens in a bedroom corner. You need about ₹1,200-2,000 to start, a basic LED grow light, and maybe 15 minutes a day. That’s it. No soil, no mess, no sunlight required. I grew mint, lettuce, and coriander — in my bedroom — during peak Delhi summer. If I can do it in 45°C heat with a cooler blasting, you can do it too.
“But won’t it attract bugs?” — This was my mom’s first reaction. And honestly, fair question. Short answer: no, not really. More on that below.
Why the Bedroom Though?
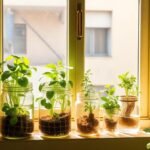
Look, I get it. It sounds a bit… unconventional. But hear me out. Most Indian apartments — especially PGs and 1BHKs — don’t come with gardening-friendly spaces. You’ve got a bedroom, a tiny kitchen, and a bathroom. Thats it. Maybe a window. Maybe.
The bedroom corner works because:
- Its the most temperature-stable room in most apartments (AC/cooler is usually here)
- You actually see your plants every day, so you don’t forget to check on them
- The corner near the window gets some indirect light which is a bonus
- Lets be real — that corner was wasted space anyway
Pro tip from someone who learnt the hard way: don’t put it right next to your bed. The LED light will mess with your sleep if you’re running it at night. Ask me how I know. 😅
My Exact Setup (No Fancy Stuff, Promise)
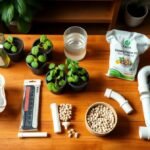
I kept this intentionally scrappy. I didn’t want to spend ₹5,000+ on some kit from Amazon. Here’s what I actually used:
| Item | Cost (₹) | Where I Got It |
| 4x plastic containers (old ice cream boxes lol) | ₹0 | Kitchen cabinet |
| Net pots (pack of 20) | ₹150 | Amazon |
| Cocopeat + perlite | ₹200 | Local nursery |
| Hydroponic nutrient solution (500ml) | ₹350 | Amazon India (not affiliate link) |
| 20W LED grow light | ₹450 | Amazon India (not affiliate link) |
| Small aquarium air pump | ₹250 | Pet shop near Lajpat Nagar |
| Total | ~₹1,400 | ————— |
Yeah. Under ₹1,500. I know some of you are thinking “that’s suspiciously cheap” and you’re right to be skeptical. But the Kratky method (which is what I used — more on this in my previous hydroponics guide) literally doesn’t need a pump for small setups. I added the air pump because I wanted to grow lettuce, and lettuce is a bit of a diva when it comes to oxygen.
How I Actually Set It Up (Step by Step-ish)
I’m not going to give you a perfectly numbered tutorial here. Partly because the process was messy, and partly because every bedroom is different. But here’s roughly what happened:
Day 1: The “Let Me Just See” Phase
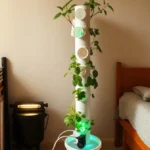
Cleared out the corner. It was about 2 feet by 1.5 feet — between my desk and the wall. Cleaned it up, put down an old plastic sheet (the kind you get from packaging). This is important because water WILL spill at some point. Trust me on this.
Cut holes in the ice cream container lids using a heated screwdriver (wear gloves, I burnt myself). Fitted the net pots in. Filled them with cocopeat and perlite mix. Done.
Day 2-3: Seeds & Patience
Dropped seeds into the net pots — mint, coriander, and lettuce. Filled the containers with water + nutrient solution (about 5ml per litre, check your specific brand). Put the LED light about 6 inches above the containers. Set a timer on my phone to remind me to turn it on and off. Yeah, I didn’t buy a timer. That was a mistake. I kept forgetting.
I forgot to turn off the light for 36 hours straight once. The lettuce was… not happy. Get a ₹200 timer plug from Amazon. Just do it.
Week 1-2: The Anxiety Phase
Nothing seemed to happen. I kept checking every few hours like a paranoid parent. My roommate thought I’d lost it. “Tu kya kar raha hai us dabbe ke saath?” became a daily question. But by day 8, tiny green sprouts pushed through the cocopeat in the mint and lettuce containers. Coriander took its sweet time — almost 12 days.
Week 3-4: The “Oh Damn This Actually Works” Phase
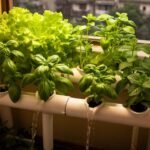
By week 3, the mint was going absolutely nuts. Like, aggressively growing. The lettuce had proper leaves, and the coriander was finally showing some personality. The room smelled amazing. Not even kidding — better than any air freshener. My mom visited and was genuinely confused. “Ye kamre mein kaun sa perfume lagaya?”
No perfume, Ma. Just photosynthesis doing its thing.
Things That Went Wrong (Because Of Course They Did)
Let me save you from my mistakes:
Mistake #1: Placing the setup on a wooden shelf. Water leaked, wood got damaged. Use a plastic tray or at least a thick plastic sheet underneath. Always.
Mistake #2: Using tap water directly. Delhi ka paani is… questionable. The TDS was around 400ppm which messed up my nutrient balance. Switched to RO water and things improved overnight. If you’re in Bangalore or Chennai, your tap water might be fine — just check the TDS once with a ₹200 meter.
Mistake #3: Overfeeding nutrients. More is NOT better. I yellowed out an entire batch of lettuce because I thought “thoda extra daal deta hoon.” Follow the damn instructions on the bottle.
Mistake #4: Not enough air circulation. The room felt humid after a week. Cracked the window open and pointed a small fan towards the setup. Problem solved. If your room doesn’t have good ventilation, factor in a small USB fan (~₹300).
But… Bugs? In the Bedroom??
Okay this deserves its own section because everyone asks this. Including my landlord, who was this close to having a heart attack.
Here’s the deal: hydroponics has no soil. No soil means no soil-dwelling bugs. I had zero insect problems in 2+ months. The only thing I noticed was a tiny fungus gnat near the cocopeat once — I let the surface dry out a bit and it was gone. That’s it. No mosquitoes (there’s no stagnant water if you use an air pump), no ants, no weird crawlies. My room was cleaner than before I started this project, if anything.
A helpful resource I referred to was the NoSoilSolutions pest management guide — solid info for beginners worrying about this stuff.
Running Cost: Surprisingly Low
People assume indoor growing = huge electricity bills. Here’s my actual monthly breakdown:
- LED grow light (12 hrs/day): ~₹60-80/month
- Air pump (24/7): ~₹30/month
- Nutrients refill: ~₹100-150/month (the 500ml bottle lasts 2-3 months)
- Water: Negligible if using RO (you’re using maybe 5-8 litres a week)
Total monthly cost: around ₹200-300. For fresh, pesticide-free herbs. In your bedroom. I spend more than that on chai every week, so… perspective.
What I’m Growing Right Now
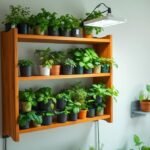
Started with three plants, now I’ve expanded to five containers (still fits in the same corner, just stacked them vertically using a cheap ₹400 rack from a local hardware store):
- Mint — absolute beast, grows faster than I can use it
- Lettuce (Romaine) — perfect for salads and sandwich wraps
- Coriander — slow but worth it, the flavour is insane compared to store-bought
- Thai Basil — new addition, loving it so far
- Spring onions — just stuck the root ends from store-bought ones, they regrow like magic
Want to know what grows best in small hydroponic setups? I covered this in detail in my 2×2 ft hydroponic garden guide — check the “what to grow first” section there.
India-Specific Tips Nobody Talks About
Most hydroponic guides online are written by people in the US or Europe. Indian conditions are different, and here’s what I’ve figured out the hard way:
- Summer (April-June): If you don’t have AC, the water temperature will climb above 30°C. Roots don’t like that. Solution: freeze some water in a bottle and dip it in the container during peak afternoon. Sounds jugaadu? Because it is. And it works.
- Monsoon (July-September): Humidity goes crazy. Your plants might develop mold. Keep that fan running and dont let the cocopeat stay wet on the surface. Also — this is the best time for growing lettuce indoors since temps are moderate.
- Winter (Nov-Feb): Honestly, the easiest time. Everything grows well. Water temp is perfect. You’ll feel like a genius gardener during winter. Don’t let it go to your head — summer will humble you quick.
- Power cuts: If you’re in an area with frequent power cuts, the air pump going off for a few hours is fine. More than 6-8 hours and your roots might suffocate. Keep a small USB-powered backup pump (This is not an affiliate link) handy — they work with power banks.
Would I Recommend This? Honestly?
Yeah. I really would. And I’m not saying that because I’m writing a blog about it. I’m saying it because I genuinely enjoy walking into my room and seeing green, living things. There’s something weirdly calming about checking on your plants after a long day at work. Its like having pets but way less responsibility.
Is it going to replace your sabzi shopping? No. But will it give you fresh mint for chai, coriander for dal, and lettuce for those midnight sandwich cravings? Absolutely. And for ₹1,500 and 15 minutes a day, I think that’s a pretty solid deal.
If you’re just starting out and want a proper step-by-step breakdown of the Kratky method and DWC systems, I’d suggest reading my complete beginner’s guide to hydroponic gardening in small spaces first. That one covers the foundations — this blog is more about the “I actually did it in my bedroom and survived” part of the story.
Also worth checking out: Epic Gardening’s hydroponics section has some fantastic video tutorials if you’re more of a visual learner. And for India-specific supplies, InHydro.in is a decent resource for kits and equipment.